
Creating your own website (or blog) is exciting stuff. Let's begin.
To have your own site, all you need to do is follow the instructions in the yellow box below. It should take about ten minutes.
Important: Please note that you don't need to download or upload anything, go to any website other than (host)'s, or do anything other than what's in this box. Just do this step, and you'll have your own website.
It's all pretty simple, but you can always talk to (host)'s Live Chat if you get stuck, or have any questions.
Click here to sign up for (host) hosting >> (Make sure you visit (host) by clicking this link, because right now they're offering a 65% discount, to readers of this guide.)
If you have a domain name you bought elsewhere, talk to (host)'s Live Chat after signing up. They'll help you connect it to (host).
(host) offers lots of extras. It's worth looking through them for anything you think might be beneficial to you. None of these extras are necessary, however.
Ignore any "easy website builder" or any other offers to help you set up a website. You want WordPress.
Click on "WP Essential" at the top of the screen.
Choose a username and password. Write them down.
Once installation has completed, click Let's Get Started, then Launch WordPress.
Congratulations. You have a website!
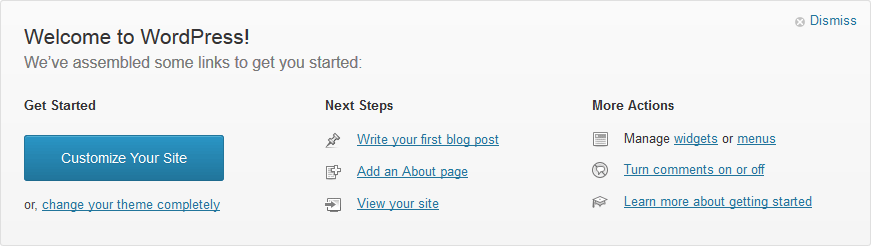 You'll see this Welcome to WordPress! panel, on your Dashboard. Just use the things on this panel for now. It contains everything you need. You can explore all the other options later. Note: Ignore the Jetpack section.
If your site is a website, and not a blog, I'd recommend clicking Customize Your Site, and choosing a static (normal) page to be the front page of your site.
Now all you need to do is to start writing blog posts (or pages if your site isn't a blog.) Start your first post now, and introduce yourself and/or your new site. Please feel free to mention and/or link to Website Setup Guide if this site has helped you. I appreciate it. :)
Good luck!
The Welcome to WordPress panel on your Dashboard should cover everything you need to know, but I've written this handy reference, in case you need more detailed instructions.
Click the "Site Admin" link on your site.
You can also go to something.com/wp-admin (Most people bookmark this page, and then remove the Site Admin link from their site later.)
Type in your WordPress username and password. (These were emailed to you. They're not the same as your (host) details. Click Lost your password? if you can't find the email.)
Click Log In.
Click Pages, then click Add New.
(You may want to untick Allow Comments here. Click Screen Options, Discussion, to see this option.)
Type a title in the Enter title here box.
Type your page's text in the big box in the middle.
Click the blue Publish button (at the right.)
A new button will be added to the menu, that links to this new page.
Type any number in the Order box. Your site's menu bar will list your pages from lowest Order to highest.
If you have lots of pages, it's best to organise them into a hierarchy, by using the "Parent" box, at the right of the screen. (For instance, you'd make a main Recipes page, and then for each recipe, you'd make a new page, and use the drop-down box to set the main Recipes page as its Parent.)
By default, the main page of your site is a blog, with one post on it. That's fine if your site is a blog, but otherwise, you should choose a different page to be your main page. (Don't just edit the blog post that's there. If you do that, it will still have the date, category and "Leave a Reply" on it.)
Create a new page, as in the step above. Then click Settings, Reading, and press the little button next to A static page.
Click the Front Page dropdown box, and choose the page you just created (you can make a new page first, or just choose the Sample Page if it's the only page there.) Click Save Changes.
If you still want a blog, you can choose another page to be your "posts page".
While you're writing a page, click Screen Options at the top right, and then tick Discussion. The Allow Comments box will appear at the bottom of the page. Untick it.
To have comments turned off on all new pages by default, click Settings, Discussion. Untick all three Default article settings boxes. Click Save Changes.
Click Posts, then Add New.
Type a title in the Enter title here box.
Type your post's text in the big box in the middle.
Click the blue Publish button.
Organise your posts, by creating Categories to put them in. (e.g. Family, Rants, Fishing etc.) Your categories are listed at the right of your website. A visitor can click on a category, and see the posts in that category.
While you're typing your post, click + Add New Category, and type in a name. Then click the button, to add it. Tick all the categories you want this post to be in.
If you'd like to help Website Setup Guide, you can mention it in your first post, which helps boost this site's ranking with Google. Just write some appropriate text, select some of it, click the chain link icon, and put in http://websitesetupguide.com
Click Appearance, Widgets.
The links and things at the right of the page are "Widgets".
Any widget in the Primary Widget Area (at the right of the screen) is active on your site. You can drag widgets in and out of there. Leave at least one widget in there, otherwise WordPress will just display an assortment of unwanted widgets.
Click Settings, General.
Change the Site Title and Tagline.
Important: Never change the WordPress address (URL) and Site address (URL) boxes on this page.
While you're editing a page, click Add Media.
Click the Detailed instructions button below, for information about aligning pictures properly.
For videos larger than 2MB, standard practice is to upload the video to Youtube, then paste the address of the video into your post or page. WordPress will show visitors the video instead of the link. (Occasionally this doesn't work. In that case, click the HTML tab above your post, then go to your video on YouTube, click Share, Embed, and then paste the code it gives you into your page/post.)
Aligning pictures: Click Select Files, and then go and find your image or video on your computer and Open it. Then click Upload.
You can add a Caption. This is a small piece of text that will appear under the picture.
I recommend choosing the Left alignment. This will make your picture move to the left of the page, with the text flowing to its right.
Near the bottom, click Insert into Post.
While editing a page or a post, select some text. Then click the little "chain" icon.
Click Appearance, Header.
Click Browse, and choose a picture on your computer. (Choose a picture at least as big as the current header. A small image blown up to that size will look pixellated.) Then click Upload.
Move and/or resize the box, to select part of this image to be your new header. Click Crop and Publish.
Click Appearance, Themes.
Click Install Themes, at the top.
Click Featured, or type in the name of a theme you'd like to search for.
Click Install, and then Install Now.
Click Activate. (Installing the theme just downloads it and makes it available to you. You need to activate a theme, to apply it to your site.)
Be aware that many themes have extra features, and some work differently or have less features than the default theme. If your chosen theme isn't working as you want it to, you'll need to investigate it yourself, or choose another theme. I can't help with themes other than the default theme.
If there's something you want to do, that's not covered on this chart, please see the Big List of Common Questions & Issues page.
If you're having trouble with any of these instructions, or you can't get your site to look how you want it to, then please go to the Contact Page.
Plugins are significant extra features you can add to your site/blog. There are thousands of plugins available. They're easy to install, and can do almost anything.
Anyone with a new blog should watch out for "comment spam" – unrelated comments like "great post, I agree" that also contain links. These are automated messages posted by robots. They're not real comments. The Akismet plugin blocks this comment spam.
The Akismet plugin comes with WordPress, but is not activated by default. Activate it in the plugins section, then follow its instructions, to get an "API key". If you tell the Akismet site that your site/blog is a personal blog, then you can get Akismet for free.
I recommend Grunion Contact Form.
In the WordPress control panel, click on the Plugins section, then Add New. Search for Grunion Contact Form, and a list of plugins will appear. Click Install Now, next to the plugin, then click Activate.
Once it's installed, edit one of your pages you'd like to put a contact form on.
Next to Upload/Insert, a second icon, called "Add a Custom Form" will have appeared. Click it.
Create your form. This is all pretty self-explanatory. Make sure you click on Email Notifications, and put in your email address.
When you're finished, click Add this form to my post. Some code will appear in your page, but don't worry. Visitors will see a contact form, not the code.
The official Facebook plugin adds "like" buttons and other Facebook features to your site.
I recommend the Slimstat plugin. It provides detailed statistics about how many people are visiting your site.
In the WordPress control panel, click on the Plugins section, then Add New. Search for Slimstat, and a list of plugins will appear. Click Install Now, next to the plugin. Then click Activate.
A new Slimstat page will appear at the left of your control panel.
I recommend the bbPress plugin. I haven't used it, but it's simple and popular.
You've reached the end of the site.
If you want to read more general information about websites, head back to Step 4: Extra Information >>
If you feel like you're ready to start making your site, head to the top of this page, and begin >>